OpenSCAD: things to remember
There’s lots of documentation and chat on the web about OpenSCAD.
This is good, but it also means some of the things I want to remember are scattered all over the place.
So here is a collection of some of useful reminders for OpenSCAD.1
Visual debugging
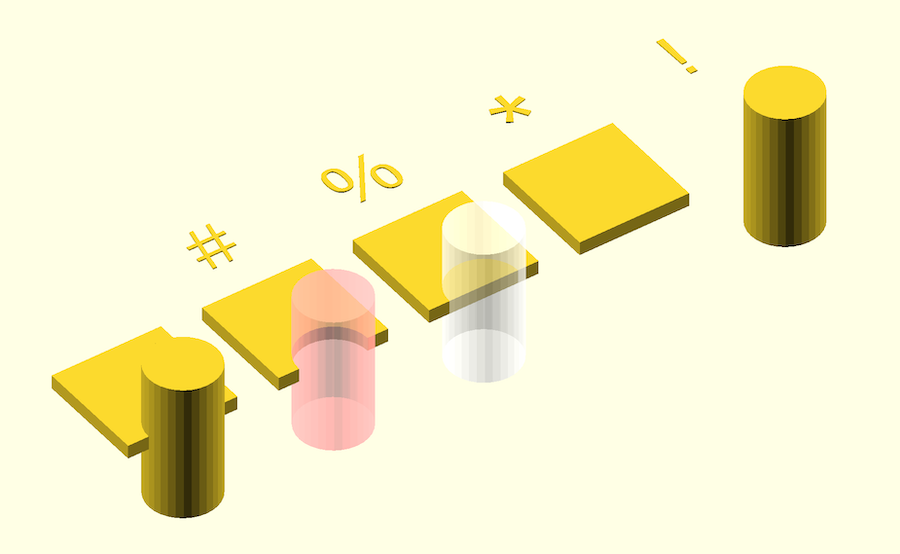
Shows only in preview (not render). Place the char before an item, e.g. #circle(10).
| Prefix | Effect |
|---|---|
# | Highlight in magenta |
% | Show as transparent / ghosted |
* | Disable / ignore object |
! | Show only that object, hide ALL others |
A picture’s worth a thousand:
Note that debug chars don’t have an effect in some places:
// the linear_extrude seems to stop the # on text from working.
// if you move the # to before linear_extrude, it works.
linear_extrude(5)
    #text("alex");
Debugging transformation composition: the power of !
The ! to show only one object has a really useful property: it doesn’t just show one part of the model, it makes that part into the root of the model.
This is really useful for debugging/checking your thinking about how transformations are combining.
Have a look at this simple example:
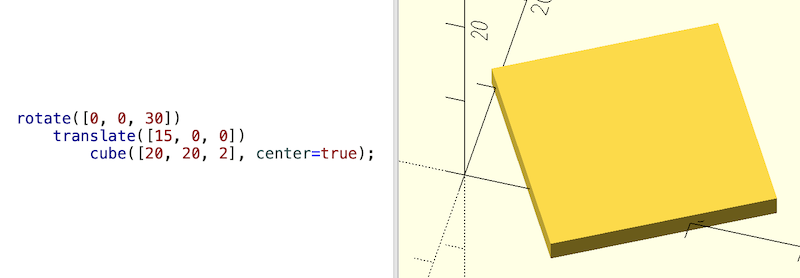
So it’s just a translate, then a rotate.
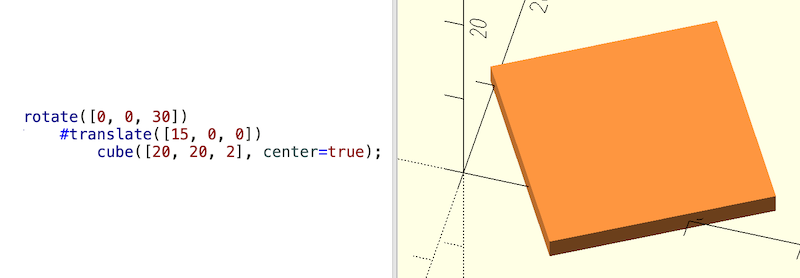
If we put a # in front of the translate, the object looks different, but it’s in the same place and orientation:
If however we use ! instead, the rotation is not in effect any more:
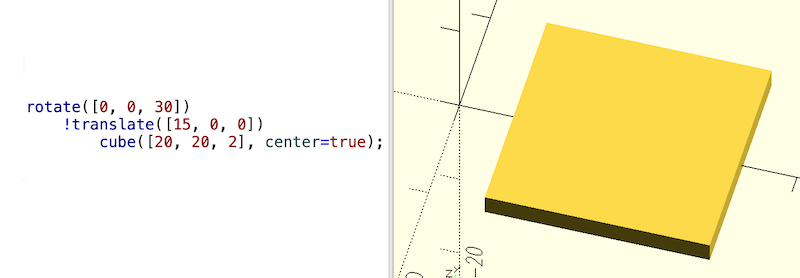
So by moving around a ! you can ‘check your thinking’ wrt the order transformations are applied and what they do.
Also:
- if there is more than one
!, only one of them will be honoured - below a
!all of the other operators are still honoured
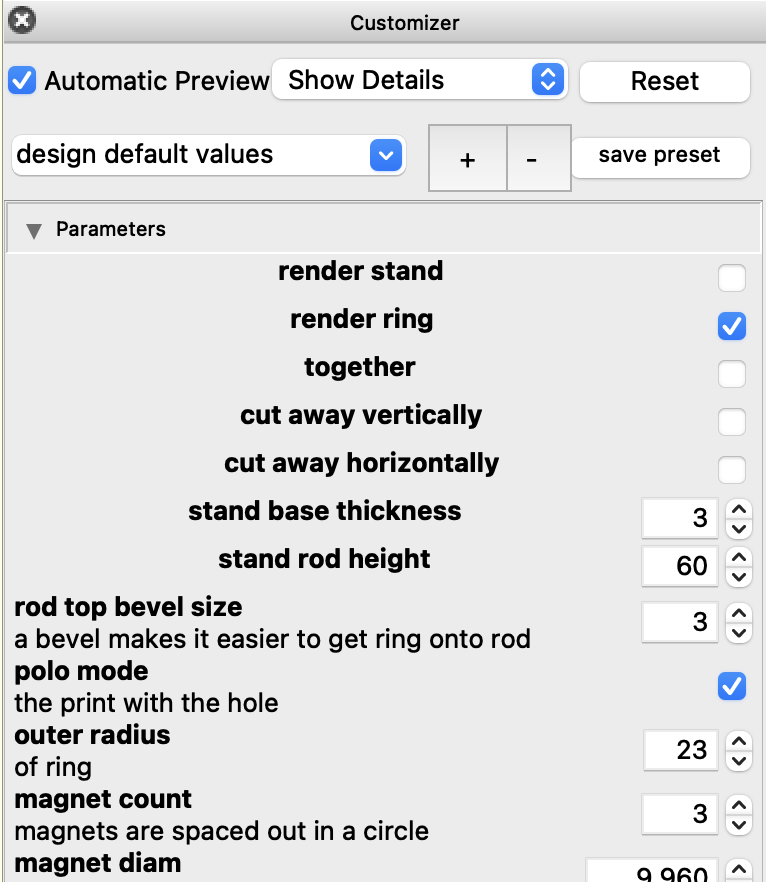
Customizer
This is an easily missed feature.
The customizer provides a UI for adjusting the properties at the top of your script. You can save named sets of properties (they’re all persisted in a single json file next to your script).
Customizer shows your property names with an appropriate edit control (it also shows a single comment line above the property definition – handy).
Library imports
Two ways of doing it:
use <file.scad>–- only imports definitions (modules, functions). No top-level geometry from that file is renderedinclude <file.scad>-– imports definitions and executes all top-level code in that file
You nearly always should use. Especially useful if you’re in the middle of developing a library of your own and it has top-level testing guff in it.
Once your library is releasable remove any top level content that isn’t needed.2
Resolution setting
To set the resolution of curves you have a choice:
$fa:  minimum angle
$fs:  minimum size
$fn:  number of fragments
The interactions between these values is nuanced.
For more complex designs you should consider customizing resolution settings per part.
Top tip: there’s an easily-missed built-in var $preview which is set to false when doing a render. You might set different curve resolutions based on this var:
// default $fn for anything not overridden
$fn = $preview ? 16 :64;

// specific fn overrides for some objects
fn_rod = $preview ? 32 : 48;
fn_rounded_box = $preview ? 8 : 16;

cylinder(10, 4, 4, $fn = fn_rod);
rounded_box(20, $fn = fn_rounded_box);
Avoiding flickering preview glitches (z-fighting)
Try to avoid parts having common faces in exactly the same plane; define and use a small epsilon value to avoid this:
eps = 0.01; // epsilon: a small value

difference() {
    cube(10, center = true);
    translate([0, 0, 3])
        // if we don't have `+ eps` here, the preview can have z-fighting
        cylinder(2 + eps, 4, 4);
}
Manual render
You can call render() to help
optimise your preview:
Forces the generation of a mesh even in preview mode. This is useful in certain situations, e.g. when the boolean operations become too slow to track.
Don’t use massive objects for difference() subtractions
Suppose you want to cut away half an object to see its insides: it’s tempting to use a massive cube with a difference().
Don’t do this! It can knacker your preview rendering if the camera viewpoint ends up inside the massive object ( more here). Use a reasonably sized cut-away object that will do the job.
Write generic modules using children
You can write general utils for any geometry using children:
module translate_anything() {
    echo("Children count: ", $children);

    translate([10, 0, 0])
        children();

    // can also access children per-index: children([idx])
}

translate_anything()
    cube(10);
intersection_for
This keyword avoids some issues that arise if you put intersection inside for.
More here
Using let
This keyword can be a little confusing: it has different uses in different contexts ( details).
In the past let was used to allow variable re-assignment but this isn’t needed in current versions:
// generates a warning in version 2021.1, but the re-assignment works
a = 1;
a = 9;
echo(a);

// no warning
a = 1;
let (a = 2) { echo(a); }
It’s still useful in functions (to break up large expressions) and in making more readable code.
function calc_thing(x) =
    let (
        y = 2*x,
        z = y + 10,
        t = z * z
    )
    t;
Rounding and chamfering objects
An ever-green topic!
Quite a few ways to do this, but some are slower than others. Be wise.
The fastest way is to do rounding on 2D shapes then extrude them into 3D (where appropriate).
Here’s 2D techniques, fastest first:
Offset
This shrinks then grows a 2D object by the same amount, giving rounded corners in the process. The resolution vars (e.g. $fn) are applied as usual.
A simple approach to fillet corners (rounding):
corner_radius = 5;
corner = [corner_radius, corner_radius];

offset(r = corner_radius)
    square([40, 20] - 2*corner, center=true);
A limitation: if you set the offset to half the smallest dimension of the shape (or less), the shape will disappear, even though it’s a reasonable ask. In the example above corner_radius=10 does it.
You can also do chamfers (45 degree corners):
offset(delta = 5, chamfer = true) square([40,20], center=true);
For 2D offset is a great default choice (it’s fast).
Circles at corners plus hull
A little more involved, but sometimes gives the result you want.
r = 3;
w = 40;
h = 20;

module rounded_rect(w, h, r) {
    hull() {
        translate([ w/2-r,  h/2-r]) circle(r);
        translate([-w/2+r,  h/2-r]) circle(r);
        translate([ w/2-r, -h/2+r]) circle(r);
        translate([-w/2+r, -h/2+r]) circle(r);
    }
}
rounded_rect(w, h, r);
3D Minkowski
For full 3D corner-rounding:
$fn = 12; // use low number while developing; use higher value when rendering

minkowski() {
    cube([40,20,10], center=true);
    sphere(r=3);
}
This can be slow; it’s potentially dealing with a lot of points.
OpenSCAD links
Document history
- 2025-12-09: first published
- 2026-02-11: added extra details on
!, moved a stray para, fixed incorrectoffsetexample
these notes use plain OpenSCAD in examples (no libs) in order to be most accessible ↩︎
you could put a demo of your lib at the top level, and people can
import(notuse) the lib to an empty script to see the demo. But that’s not usually done, and fair enough: why bloat your lib with a demo someone might run once? Demos can go in a different file ↩︎