Drumming: Snare technique fundamentals
These are notes from a workshop I gave on Snare technique for Beltane 2021 (Acropolyptic).
The target audience is someone learning basic technique from the ground up, particularly in the context of processional drumming (playing a single drum). But the skills can equally apply to kit drumming etc.
Developing snare technique is hard. It can take ten hours or more practice time to start solidifying things, due to the fine motor control and muscle memory training involved.
Disclaimer: I’m not a music teacher or professional musician.
If you’re very serious about learning an instrument, a professional teacher is recommended. Especially because they will stop you picking up bad habits from day one; habits that are hard to shake the longer you practice them for.
This note takes a look at some basic snare technicalities. It doesn’t get into the myriad different musical genres, cultures, and styles of rhythm – it’s just about snare technique at a fundamental level.
A solid foundational technique can underpin all sorts of interesting possibilities later; the sky’s the limit.
Terms used
- Strong: your dominant hand (right, if you’re right-handed)
- Weak: your non-dominant hand
- Accent: a loud hit of the snare
- Ghost: a quiet hit of the snare
- BPM: beats per minute (speed of the drumming)
- stick tip: the end of the stick that hit the snare
- the grid: playing only evenly-spaced ghost notes. Think of it like a bare field where you might want to ‘plant’ some accents here and there
The two legs: evenness and differentiation
There are two fundamental ‘legs’ supporting a good technique:
Evenness is hitting the snare with alternating hands (sticks) in a way that evenly divides time. You’ll have a stronger hand and a weaker hand, and the weak hand will tend to hit slightly later than it should (‘drag’).
The simplest snare practice involves just hitting the drum with alternating hands to a beat. It’s good to do this with a metronome, but it’s also good to do it sometimes without a metronome.
Try recording yourself doing this (without a metronome) at various speeds. On playback, can you hear which is your strong and weak hand? Ideally you can’t. If you can tell which is which, why? Is it because the quality of the sound of the hits is different, or is it because the timing isn’t even? Or both?
Exercise:
While playing a steady beat with your strong hand, practice turning on and off weak hand hits alternating in-between the strong hits (the strong hand BPM should remain the same, so the audible BPM will double when you add weak hand hits.)
Differentiation is the ability to hit accent and ghost notes that sound quite distinct, even if they follow each other. Ghosts are hit with the stick tip starting at a low height (near the skin), and accents are played with the stick starting at a high height.1
Exercise:
- Play alternating accent/ghost notes with just your strong hand. Try different speeds, using a metronome to mark both the accents and ghosts
- Same as 1, with your weak hand
- Same as 1, with both hands simultaneously. Your hands should be a mirror image of each other at all times
And here’s the main thing that makes snare tricky: as a beginner, these two ‘legs’ want to interfere with each other – imagine trying to walk with crossed legs. If you’re concentrating on differentiation, your evenness might suffer, and vice versa.
Everyone starting on snare has this issue to deal with. But with practice, you can “uncross your legs”.
Practicing both aspects at once
A good way to approach this is to just start with one of the legs and slowly add in the other.
I recommend starting with the evenness leg, by playing the grid – all ghost notes, using a metronome for steadiness. Then start inserting a single dominant hand accent every now and then.
For example, if you’re right handed: start playing just the grid. After a little while of that, start playing an accent every 4th hit of your right hand. The accent here doesn’t have to be a walloper of a hit – just reasonably different sounding to the ghost notes; making your accents even more differentiated can come with time. For now, just making that accented note sound noticably louder is the aim.
But bear in mind that you want to avoid any of the ghosts around it changing. And of course try to keep all your notes evenly spaced, including around the accent.
Recording yourself and listening back sometimes is crucial! While you’re performing a skill, there’s less attention and brain power available for properly listening to the result. It’s still surprising to me how different something can sound while you’re doing it, compared to just listening to the playback.2
Differentiation: improving your Chops
In exercise 1, you were alternating accent and ghost hits for a single hand (or both at once). So that’s all that’s needed to practice differentiation?
Not quite!
A stick tip needs to be at the right height to play the next note (far from the skin, or close to the skin). There are four possible pairings of snare hits for a single stick:
- ghost → ghost
- ghost → accent
- accent → ghost
- accent → accent
In each of those situations, the hand is executing a different kind of move because it has to end in the right place for the 2nd hit.
- ghost → ghost: stick tip starts low, HIT, stick tip ends up low
- ghost → accent: stick tip starts low, HIT, stick tip ends up high
- accent → ghost: stick tip starts high, HIT, stick tip ends up low
- accent → accent: stick tip starts high, HIT, stick tip ends up high
So ideally we want to make sure we’re practicing these four moves.
Any complicated enough rhythm with accents and ghosts will contain all these ‘moves’, but for practice it’s useful to have a compact rhythm to play that contains them all. Enter Chops.
Chops
This is a short 3-beat exercise for one hand that covers all the four ‘moves’ in the least time:
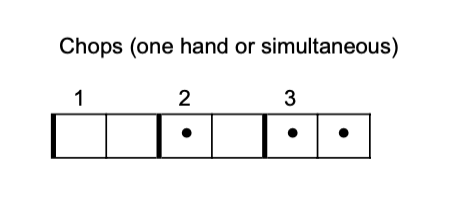
There are many ways to practice with Chops:
- Playing at various tempos
- Single hand at a time (do practice both strong and weak hands solo though)
- Both hands simultaneously (so they mirror each other)
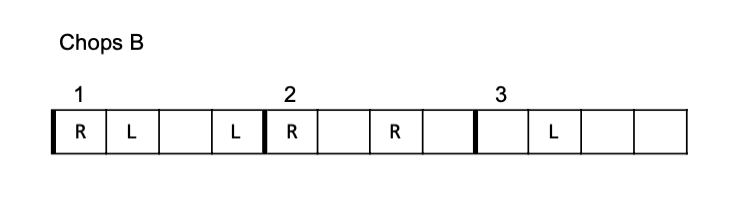
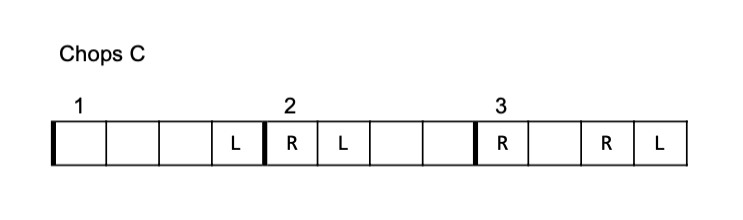
- Both hands alternating – play both hands alternating as usual, each hand playing the single handed rhythm, i.e.:
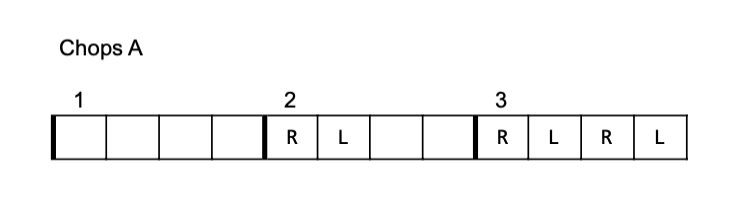
You can make this two-handed Chops a bit more interesting by playing a variant: you play the same basic Chops beat on each hand, but with the hands starting at different points in the rhythm. This way, both hands get the same practice, but the rhythm is more interesting and you’re not inadvertently training your brain to closely link what your hands are doing.
There are two unique Chops variants that do this:
Finally, if beats in 4 are more your thing, it’s easy to extend the one-handed Chops to 4-Chops:
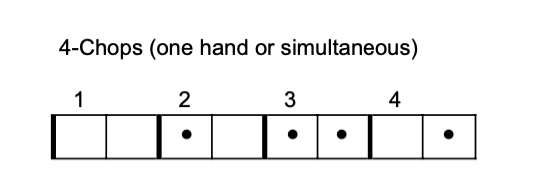
…and you could also play the two-handed version of this.
Differentiation’s little helper: placement
Once you’ve solidified getting your legs “uncrossed” (i.e. can maintain beat evenness while getting decent differentiation of accent/ghost), you can consider placement. This is varying where on the drum skin you hit: for accents, you want to hit near the centre as usual, but for ghosts you hit near the rim (further away from you). Any hit away from the centre of the skin is quieter, so this helps dampen down your ghost notes.
This takes some practice, because it changes differentiation from a one dimensional variable (the height of your stick before a hit) to a two dimensional variable by adding a “forward/back” part.
Placement can be used to varying degrees depending on your situation:
- If you’re playing fast, you’ll find yourself less able to do the forward/back part while keeping up the speed, so you might just drop the variable placement and play all hits on the centre of the skin
- If you’re playing live and it’s very loud, you might not be so bothered about having the ghost notes so controlled, so you might hit closer to the skin centre for your ghosts
the height of your stick tips should be controlled mainly by your wrists. Don’t lift your forearm up! ↩︎
this of course applies to lots of instruments and lots of skills. I have an ok sense of relative pitch, but when I’m playing the cello I’m amazed by how much more obvious intonation (tuning of the notes) problems are on playback. I think one of the many skills of musicianship is dividing your brain up suitably while performing: on cello, you want enough attention paid to pitch/timing, but not so much that it hurts the other things, like your rhythm ↩︎