SFX electronics: LED skin prosthetic Plan B
The best laid plans of mice and men…
Extremely tight deadlines for pre-production mean there’s no time to fab+assembly (given that a revision to first fabs might be needed), so time for plan B: a much simpler push-button wired solution, no MCU etc.
But first a summary of where I got to with the PCB.
The PCB design for MCU unit (“brain”)
The schematic as planned for fabrication:
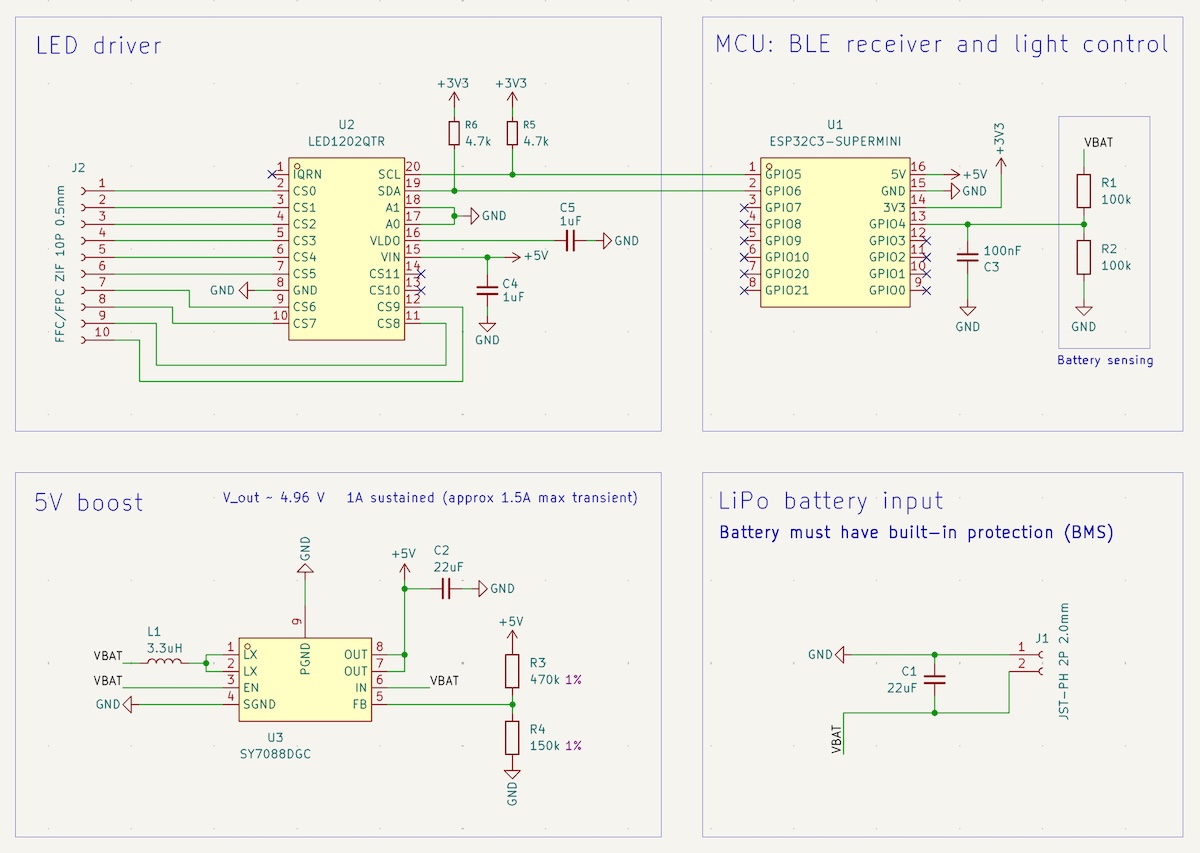
One thing I’d do differently next time fabricating: verify the fabricator can handle the package sizes I want to use ahead of selection. The LED1202 is in a QFN package; the shortest distance between pads of the QFN is 1mm, and my choice of fabricator has a minimum 1.27mm track separation distance.1 Oh noes.
Plan B
The ‘not enough time’ fallback is to a simple push-button (or toggle) controlled light setup: a control board feeding a 22/24 AG 4-core cable leading to a light unit with 3 controllable lights (each ‘light’ is 3 LEDs of same colour).
Design notes:
- One resistor per LED as usual.2 This dictates the LED resistors are part of the light unit itself; they cannot be on the control board end3
- routing the LED currents directly through the controller buttons/switches is usually fine for the low currents we’re talking about, if the parts are decently made. But for higher currents would want transistors switching the LED currents via a small current run through controls4
- Cable from control box to light unit: insulated 4-core of around 22/24 AWG should be fine (3 for lights, 1 for ground). See e.g. UL2464
- Might want plug+socket for attaching light unit cable to control (no messing about with inserting wires into breadboards).5 If we had one permanently attached light unit, it should be wired securely to controller
Multiple actor light units
The design can extend in a simple way to multiple actor light units if we have all units showing the same light configuration: a plug and socket for each actor/light.6
Would have to mindful of having enough current available (under-current would tend to give under-voltage and hence flaky/weak lights).
Power
The wired-controller should be battery powered.
It’s tempting to use a USB battery pack but there are woes here: most USB battery packs turn off if they are not delivering a minimum amount of current (around 50-150mA), and a lot of LED lighting applications are below that current.
To make matters worse, the low current auto-off time is variable between USB battery packs (I’ve seen 2 hours reported, ouch), so even just testing a single USB battery pack is not trivial.
There are some ‘trickle power’ USB battery packs like the Anker 313 Power Bank (PowerCore 10K, model A1229) that will not auto-off as easily (I believe 30–90 mA min current for this one). Better, but still a risk; I understand they can still auto-off after a couple of hours.
A much better solution is to get something up to the job: AZDelivery sell a nice 3.3v/5V LiPo battery for this kind of use.
USB power bank low-current references:
- Powering low current electronics projects with power banks
- Instructables: measuring shutdown current of your USB battery
- discussion in Arduino forums
in chat online some people say “1mm will work fine, there just won’t be solder mask” etc. but when you already don’t have much time this is not the sort of risk you want to take ↩︎
to avoid current mismatch issues as usual; do not use 1 resistor for multiple LEDs ↩︎
well, resistors could be on the control board end, if you ran 10 wires to the light unit/actor (3x3 + 1), but that’s crazy talk ↩︎
and for dangerous levels of current you’d do careful design with electro-physical isolation of user-safe currents from the high currents ↩︎
plug+socket choice: something like JST-SM 4-pin; generic versions are available pre-wired approx 15cm. Avoid connectors like TRRS; although tempting, during mating they momentarily connect the wrong conductors together (ouch). Instructions for the light controller should say “turn off when plugging/unplugging light units” ↩︎
parallel current splitting across light paths means light units maintain their usual brightness even in presence of other units (assuming enough current available) ↩︎